Add the SDK
Before you can integrate the AwesomeAds SDK, you need to add the SDK to your project.
Add the AwesomeAds SDK to your Unity project
The AwesomeAds SDK is built as a Unity package so that it works together with the Android and iOS native SDKs. This enables you to harness the full power of native components, such as video based on AVFoundation / VideoView technology, proper WebViews and a better fullscreen experience.
To integrate the SDK:
- Download the latest AwesomeAds Publisher SDK (Unity).
-
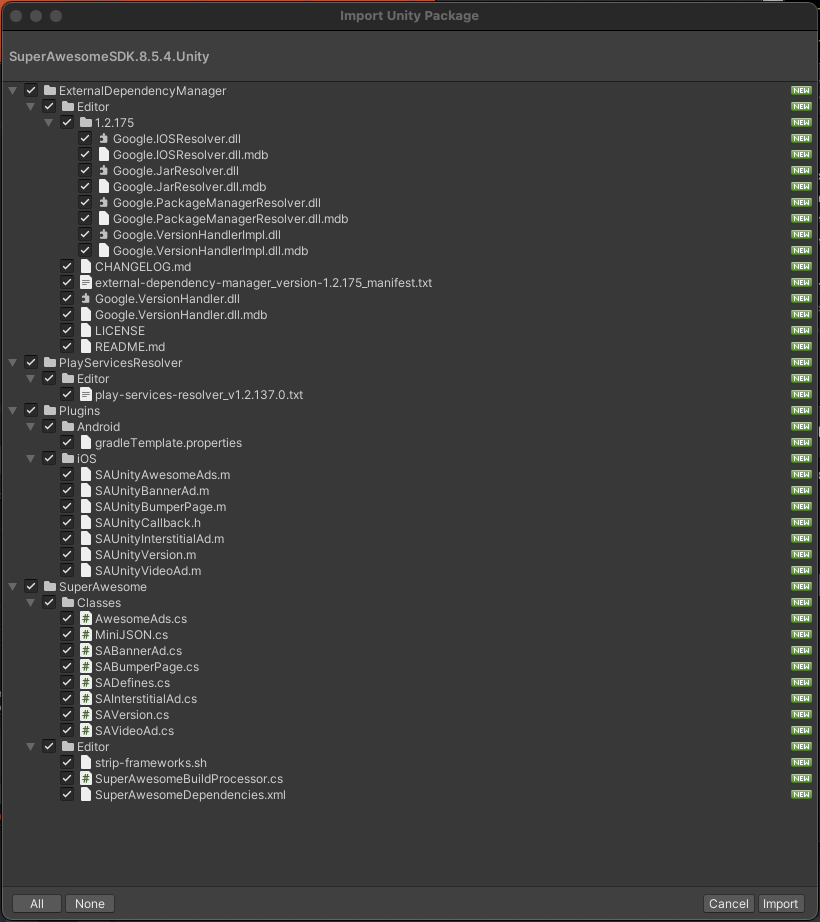
Import SuperAwesomeSDK.Unity.X.X.X.unitypackage into your Unity project as a custom assets package. You should see a dialog similar to this:
-
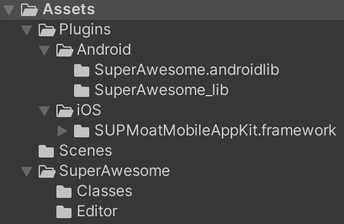
Select all the files, and click Import. A series of new folders and files should appear in your Assets directory:
- After you integrate the SDK, you can access it like this:
using tv.superawesome.sdk.publisher;
If using SuperAwesome Unity version 10.0.0 onwards
Android Minimum SDK
Starting with version 10.0.0, the minimum Android SDK is API 23 (Android 6.0). Ensure your project’s minSdkVersion is set to 23 or higher.
Running Android
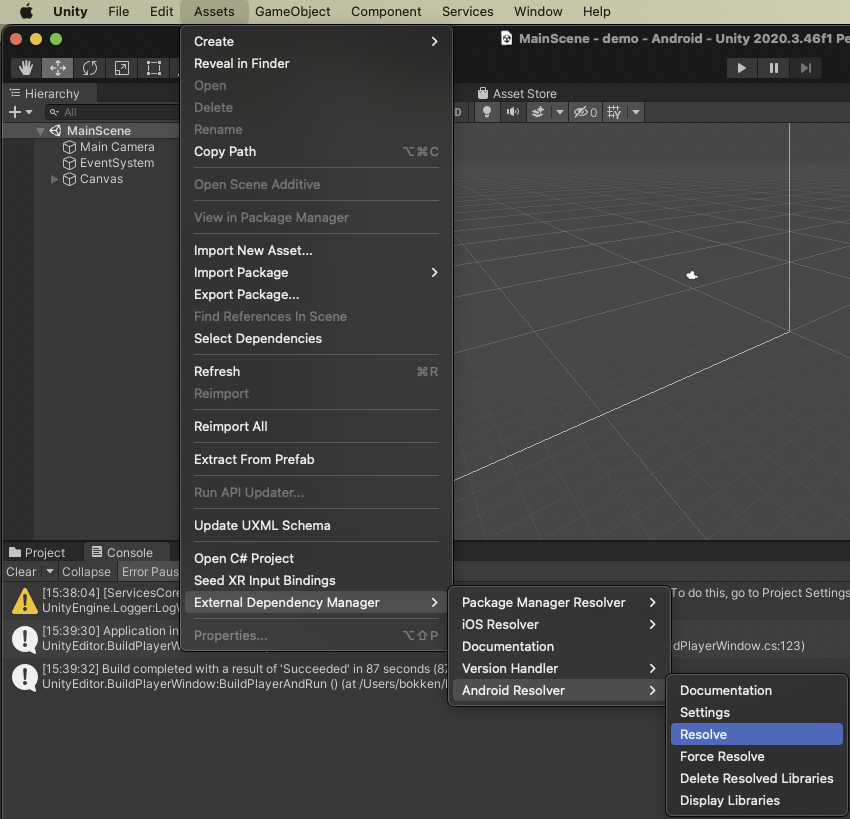
In the main tool bar, go to Assets > External Dependency Resolver > Android Resolver > Resolve, this will open a new window showing the gradle script running as the external dependencies are resolved.
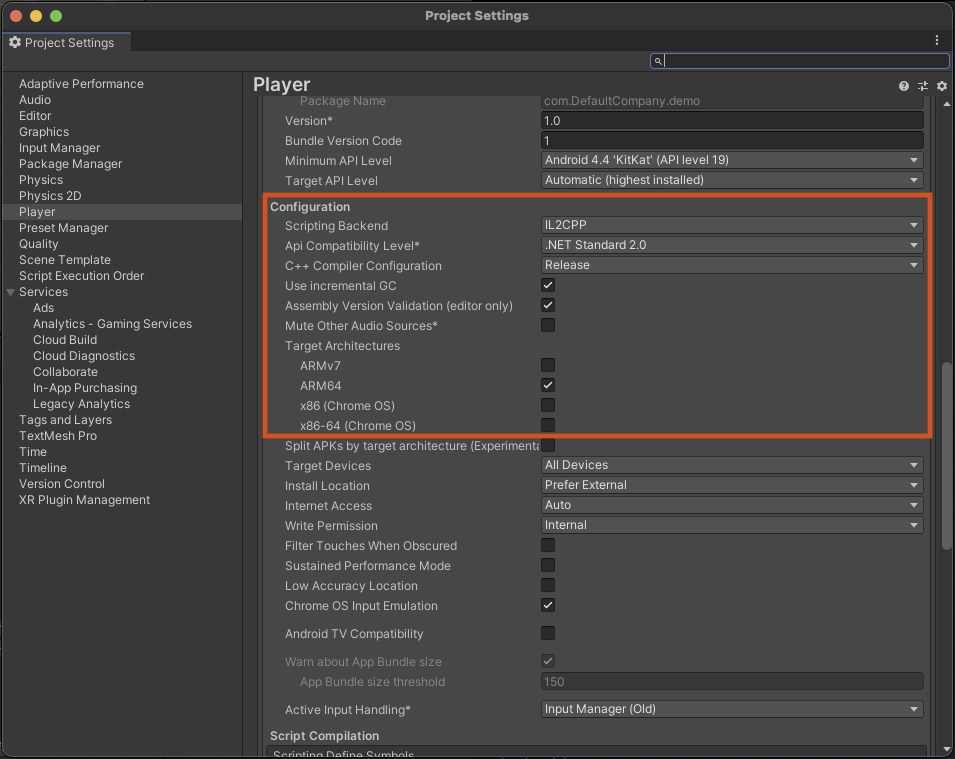
Once the above step has finished, set the player settings to build Android using the correct architecture for your device (arm64/x86_64) this will require the scripting backend to be set to IL2CPP. After this, you can build and run.
Running iOS
Starting with Unity SDK version 10.0.0, the iOS SDK is distributed via Swift Package Manager (SPM) instead of CocoaPods.
Minimum iOS Version
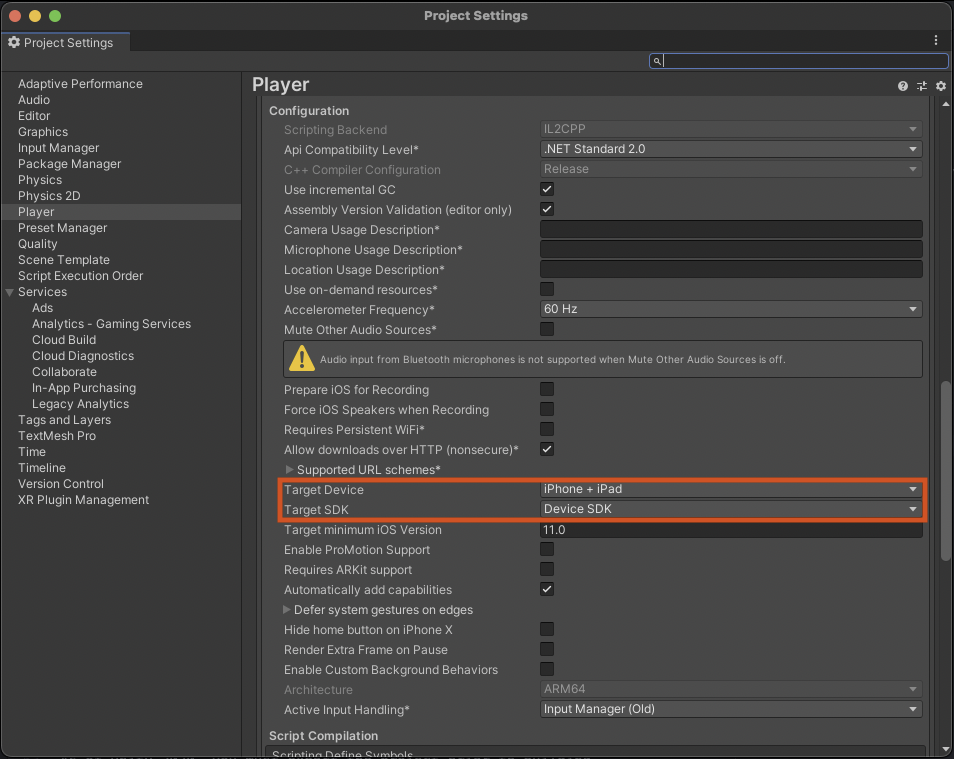
Unity SDK version 10.0.0 and above requires a minimum iOS deployment target of 13.0. Ensure your Unity Player Settings reflect this under Other Settings → Target minimum iOS Version.
The External Dependency Resolver will automatically resolve the iOS dependencies using SPM. To ensure the dependencies are resolved, go to Assets > External Dependency Resolver > iOS Resolver > Resolve.
Next, set the player settings to build for iOS (If on an Apple Silicon device, ensure this is built for device).
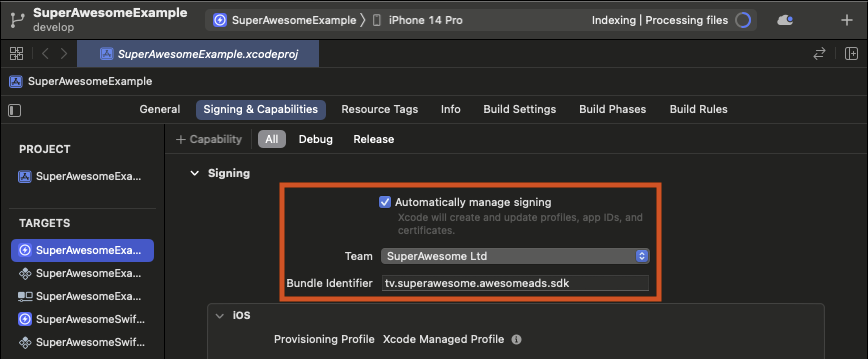
When the project has been exported, open the generated .xcodeproj file in Xcode. Set up your provisioning profile in the iPhone-Unity target and run on device.
If you are upgrading from a previous version that used CocoaPods, please remove any existing Podfile and CocoaPods-related files from your exported iOS project, as well as the SuperAwesome.xcframework, Moya.xcframework, Alamofire.xcframework and XMLParser.xcframework from the frameworks folder as these are no longer needed.
NOTE:
We have now automatically disabled BitCode support as this is now deprecated in Xcode 14 and above. If you wish to disable this behaviour, remove Assets/Editor/DisableBitcode.cs
If using SuperAwesome Unity version 8.5.5 to 9.x
Running Android
You will notice that there is a new menu item in the main tool bar, go to Assets > External Dependency Resolver > Android Resolver > Resolve, this will open a new window showing the gradle script running as the external dependencies are resolved.
Once the above step has finished, set the player settings to build Android using the correct architecture for your device (arm64/x86_64) this will require the scripting backend to be set to IL2CPP. After this, you can build and run.
If you are upgrading, please remove the classpath 'org.jetbrains.kotlin:kotlin-gradle-plugin:XXX' from the main build.gradle file and apply plugin: 'kotlin-android' from the launcher build.gradle and unitylibrary build.gradle as this will cause duplicate class conflicts.
Unity 2019 Android tweaks
For Unity 2019 you will need to export your Android project and update the gradle build tools to version 4.0.2 in the main build.gradle file:
dependencies {
    classpath 'com.android.tools.build:gradle:4.0.2'
}
Also make sure that the gradle version is set to 6.1.1 in the gradle-wrapper.properties file:
distributionUrl=https\://services.gradle.org/distributions/gradle-6.1.1-bin.zip
Running iOS
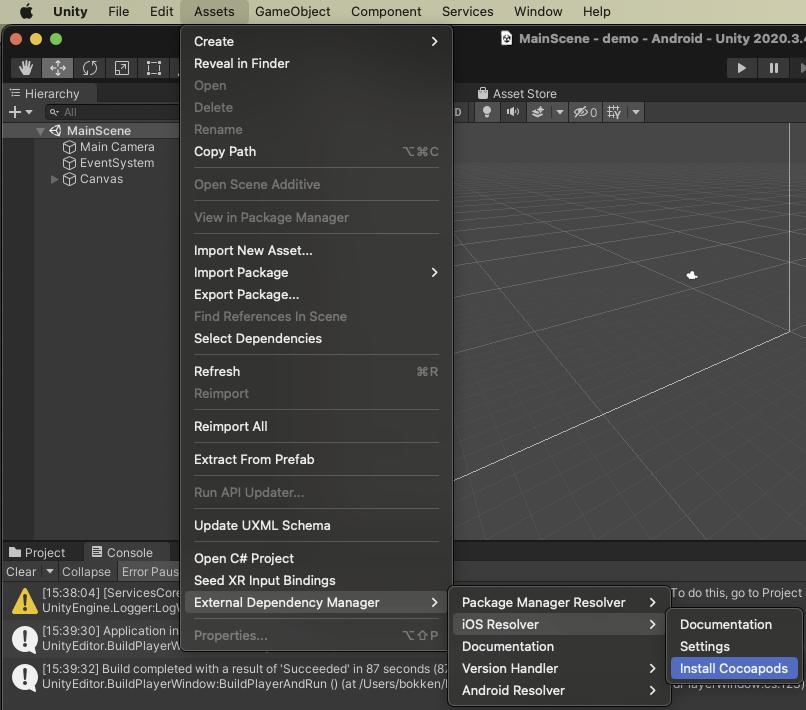
You will notice that there is a new menu item in the main tool bar, go to Assets > External Dependency Resolver > iOS Resolver > Install Cocoapods, this will install Cocoapods in your Unity Editor workspace.
Next, set the player settings to build for iOS (If on an Apple Silicon device, ensure this is built for device).
When the project has been exported, set up your provisioning profile in the iPhone-Unity target and run on device.
If you are upgrading, please remove the SuperAwesome.xcframework, Moya.xcframework, Alamofire.xcframework and XMLParser.xcframework from the frameworks folder as these are no longer needed.
Unity 2019 iOS tweaks
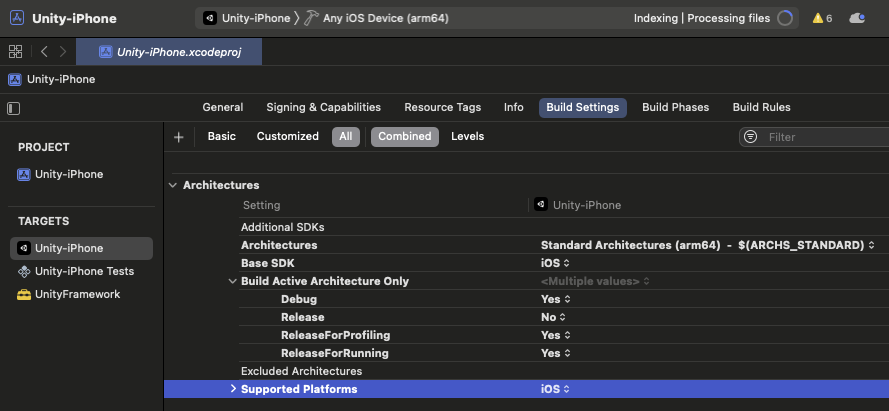
For Unity 2019, you may need to change the Architectures, Base SDK and Supported Platforms in the build settings of all targets including the cocoapods targets in the Pod project to Standard Architectures and iOS. The below screenshot shows how this should look:
CocoaPods troubleshooting
You may encounter an error related to cocoapods not being able to run due to pod repo-update, it looks like this:

And in the log for this error, you will see:
After the failure, "pod repo update" was executed and failed. "pod install" was then attempted again, and still failed. This may be due to a broken CocoaPods installation. See: https://guides.cocoapods.org/using/troubleshooting.html for potential solutions.
To fix this, navigate to the exported folder containing your iOS project with the Podfile in a terminal window, then run pod install --repo-update. Now you can open your iOS project from the XXXXX.xcworkspace
NOTE:
We have now automatically disabled BitCode support as this is now deprecated in Xcode 14 and above. If you wish to disable this behaviour, remove Assets/Editor/DisableBitcode.cs
If using SuperAwesome Unity version 8.5.4 and below
Configure Android Project
There are some additional required steps in order to get ads working in your Android app when using the SuperAwesome Unity SDK.
Export the project
As of Unity 2020, you must export the project prior to building.
- Select File > Build Settings.
- In the Platform list, select ‘Android’, and then tick the Export Project checkbox.
- To build the project, click Build. This triggers the export.
Add Kotlin support
The SuperAwesome SDK requires Kotlin support to be added to your Android project in order to work properly. Without Kotlin, your app might build and run successfully but the SDK will fail to display an ad.
To add Kotlin:
- Include the following entries in the list of repositories in your project’s Android
build.gradlefile:
repositories {
  ...
  mavenCentral()
  google()
  jcenter()
  ...
}
- Add the following
classpathentry in thebuild.gradlefile:
dependencies {
  ...
  classpath "org.jetbrains.kotlin:kotlin-gradle-plugin:1.6.20"
  ...
}
- Include the Kotlin plugins in the
android.launchergradle file:
apply plugin: 'kotlin-android'
Configure iOS Project
Once you’ve built your Unity project you will need to adjust some settings in the iOS project using Xcode.
Enable Legacy Build Systems (Below SDK 8.0.5 only)
SDK versions 8.0.5 and older are incompatible with Xcode’s New Build System. If you use one of these versions, click File > Project Settings and then change Build System from ‘New’ to ‘Legacy’ by selecting from the dropdown menu.
Disable Bitcode Support
Bitcode support is now no longer required or supported by Apple. To disable this search for the Enable Bitcode setting in your XCode project settings and set it to No for all targets (Unity-iPhone, UnityFramework, Unity-iPhone Tests). Please note that only certain versions of Unity will enable this by default, so you may not need to change this setting.
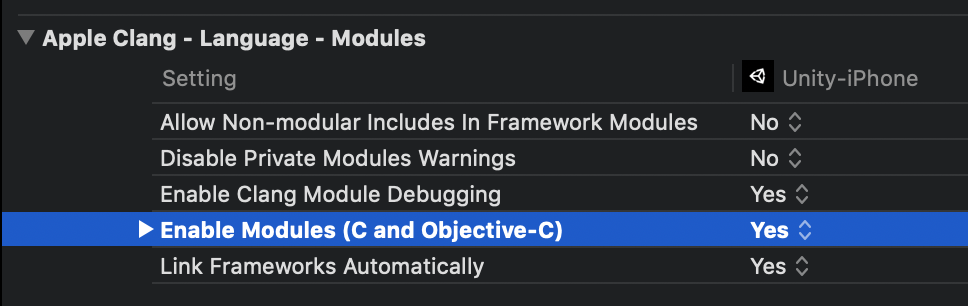
Set Enable Modules (C and Objective-C) to ‘Yes’
This setting is only required if it is available in your version of XCode.
Add Additional Frameworks
-
From the releases page, download
SuperAwesomeiOS.zipfrom the same release that you downloaded the Unity Package from. This contains additional dependencies for iOS. -
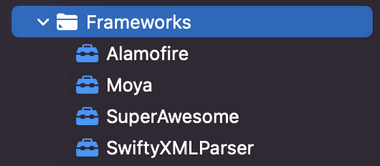
Unzip
SuperAwesomeiOS.zipand drag theSuperAwesome.xcframeworkand all other XCFramework dependencies provided into the Frameworks folder:
-
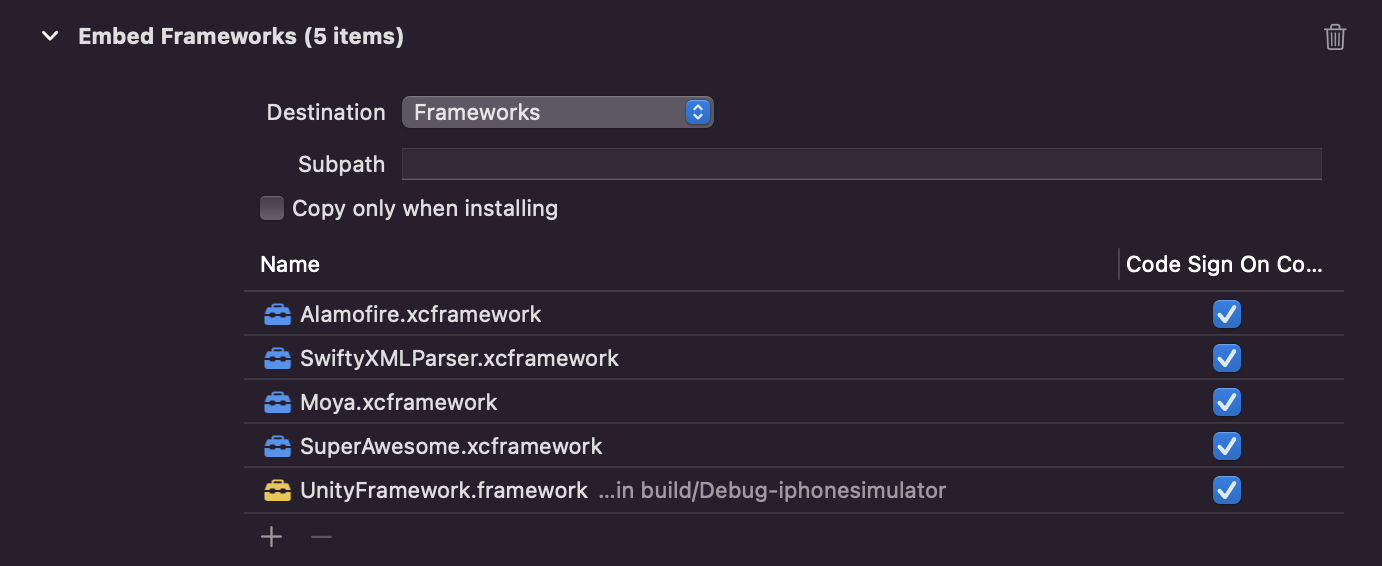
In the General section for the Unity-iPhone target, add the
SuperAwesome.xcframework,Moya.xcframework,XMLParser.xcframeworkandAlamofire.xcframeworkto the list, ensure that Embed & Sign appears next to them. -
In the General section for the UnityFramework target, add the
SuperAwesome.xcframework,Moya.xcframework,XMLParser.xcframeworkandAlamofire.xcframeworkto the list, ensure that Do Not Embed appears next to them.
Debugging Unity Ads
If you’re not seeing ads loading when using the Unity SDK it’s recommended to check the logs in your platform IDE when running your application. The SDK will log what it is doing to the standard logger in your IDE. You can then use the logs here to figure out if there is a problem with loading ads and where the issue might be.
For Android use the Logcat tool as part of Android Studio.
For iOS use the logging built in to XCode.